PA3: LLVM IR
Useful Links
For this assignment, you will need to consult the LLVM documentation. Here are links to the documentation for the version of LLVM (15.x) we are using:
- LLVM Language Reference Manual – The “Instruction Reference” in particular will be useful to determine which instructions you will need to use for the variety of usage cases.
- LLVM Programmers Manual – There’s a lot of information in this document, but make sure you read the class hierarchy section which describes the relationship between
User,Value, andInstruction. The “Helpful Hints for Common Operations” section also has several examples of operations you will need to perform in PA3, PA4, and PA5. - IRBuilderBase Class Reference – You will use the
IRBuilderto create instructions; the base class contains the relevant functions.
Introduction
The endpoint of PA2 was a front-end for USCC that can identify syntactically and semantically valid USC programs. This generates an AST which can be printed to the console, but it cannot actually execute in any meaningful way. In this assignment, you will lower the AST to LLVM IR. This lowering process will lose a great deal of information about the higher-level source program, but the benefit is that the LLVM IR is more easily optimized and can ultimately be converted to machine executable code.
By default, the USCC compiler compiles into a .bc file which contains the LLVM IR (which is also referred to as LLVM bitcode). You can also instruct the driver to pretty-print the IR to stdout using the -p command line flag. You don’t need to pass the -a or -l flags anymore.
For instance, once you complete this assignment, you could use the following args in Visual Studio Code to compile and pretty-print the IR for the ssa01.usc program:
"args": ["-p", "ssa01.usc"]
The output will look something like this:
; ModuleID = 'main'
source_filename = "main"

@.str = private local_unnamed_addr constant [4 x i8] c"%d\0A\00"

declare i32 @printf(i8*, ...)

define i32 @main() {
entry:
  %y = alloca i32, align 4
  %x = alloca i32, align 4
  store i32 5, i32* %x, align 4
  store i32 6, i32* %y, align 4
  store i32 7, i32* %x, align 4
  store i32 10, i32* %x, align 4
  %x1 = load i32, i32* %x, align 4
  %tobool = icmp ne i32 %x1, 0
  br i1 %tobool, label %if.then, label %if.else

if.then:                                          ; preds = %entry
  store i32 20, i32* %y, align 4
  br label %if.end

if.else:                                          ; preds = %entry
  store i32 15, i32* %y, align 4
  br label %if.end

if.end:                                           ; preds = %if.else, %if.then
  %y2 = load i32, i32* %y, align 4
  %0 = call i32 (i8*, ...) @printf(i8* getelementptr inbounds ([4 x i8], [4 x i8]* @.str, i32 0, i32 0), i32 %y2)
  ret i32 0
}
Sanjay@MacBook-Pro-6 solutions %
This example also illustrates the main properties of LLVM IR. Each function is represented with a control flow graph (CFG). A basic block in a CFG represents a sequential chain of execution, and it always ends with a terminator instruction, which represents a jump in control flow such as a branch or a return. The terminator instructions thus represent the edges in the CFG.
You’ll also notice that LLVM IR looks very similar to assembly code, with the notable exception that there is an infinite number of registers called virtual registers. One key property of these registers is they can only be assigned to once – this is called SSA form which will become more relevant in PA4 when you implement emitting SSA form. For now, we will largely bypass SSA form by using the stack to store local variables.
The test suite associated with this programming assignment is testEmit.py. This test suite first compiles USC code into LLVM bitcode, and then interprets this bitcode via lli. The output from executing each program is then compared against the expected output. This ensures that the bitcode is both well-formed and functionally correct.
To run this test suite, execute the following command from the tests directory:
python3 testEmit.py
When you initially run this test suite, all 21 tests will fail. As you start filling in code in parse/ASTEmit.cpp, more and more tests will pass.
It is also possible to compile LLVM bitcode into platform-specific assembly via the llc tool. Once you have platform-specific assembly, it can be assembled into a native executable.
In this assignment, the vast majority of the code you will write goes in parse/ASTEmit.cpp, which contains the implementations of the emitIR function for each type of ASTNode. The emitIR function takes in a CodeContext by reference and returns a pointer to an llvm::Value. The CodeContext struct is defined in parse/Emitter.h. Of particular note is that the CodeContext contains a pointer to the current basic block called mBlock. This allows each emitIR call to know where the instructions should be added. This also means nodes that create basic blocks must update mBlock. The other member variables are used in some specific cases. For example, mGlobal can be used to access the global LLVM context.
Generally, the recommended way to add instructions to a basic block is by using the IRBuilder class. You can declare an instance of IRBuilder as follows:
IRBuilder<> build(block);
Where block is the basic block you want to add instructions to. Once you create the IRBuilder instance, there are many functions prefixed with Create that can be used to append instructions to the basic block. Conveniently, these functions return a pointer to the instruction (which for most instructions corresponds to a Value pointer).
Implementation
You should implement the emitIR functions in the order outlined below. If you do not follow this order, it will be more difficult to pinpoint the nodes that are not implemented properly.
ASTExprStmt
ASTExprStmt is very straightforward – it simply needs to call emitIR on the mExpr member variable. In this case, since an expression statement simply evaluates and does not return any value, the emitIR function should just return nullptr.
ASTCompoundStmt
A compound statement contains a list of declarations, followed by a list of statements. So this node just needs to emit each of the declarations, and then each of the statements. As with expression statements, we do not expect the node to return any values.
ASTConstantExpr
A constant expression is an expression representing a constant number. To create a ConstantInt, use the ConstantInt::get static method. This requires a type, which you can get using Type::getInt32Ty or getInt8Ty, depending on whether the constant is an integer or a character. Since this ConstantInt will be used, you must return the pointer to it.
ASTReturnStmt
This is the first node that will actually generate instructions via an IRBuilder. You will want to either CreateRet or CreateRetVoid, depending on the type of the statement. If the return is not void, you must first emitIR for the expression. This instruction does not need to be returned by emitIR.
If you’ve implemented the nodes up to this point properly, three tests should pass: emit02, emit05, and emit10.
ASTBinaryMathOp
This node should generate the lhs and rhs expressions, and then create and return appropriate instruction based on the op: add (+), sub (-), mul (*), sdiv (/), and srem (%). Note that for instructions that return values, you can provide a name hint that corresponds to a suggested name for the virtual register that’ll store the result. You should use names that make sense like "add", "sub", and so on. If the name is already in use, LLVM will automatically append a number to it to keep it unique.
ASTBinaryCmpOp
This is very similar to binary math ops, except you are generating ICmp instructions. One other difference is you need to zero-extend (Zext) the result of the ICmp math op into a Int32Ty. The reason for this is to allow for the C-style conversion of comparisons into integers.
At this point, the emit03 test should also pass.
Creating Stack Space for Local Variables
For now, all local variables will exist on the stack. This is to work around the fact that LLVM uses an SSA form, meaning each virtual register can only be assigned once. In order to support this, you need to allocate stack space for these variables in parse/Symbols.cpp in ScopeTable::emitIR. Each function has a ScopeTable that encapsulates all of the variables declared within the function. Then when the code for the function is generated, the scope table will emit the static space for local variables.
The emitIR function is already implemented for arrays, because arrays are somewhat complex. You will need to implement it for regular variables. This just involves using an alloca instruction. When you alloca, you will need to also supply the correct LLVM type, which you can get with an llvmType(true) member function call on the identifier. The identifier’s address should then be set (using setAddress) to the result of the alloca.
There is one special case to handle, which is the case where the address already exists for the identifier, in which case getAddress() does not return null. This means that the identifier is a function parameter. In this case, the value stored in the address initially is actually the value of the parameter. So after you alloca, you will need to store the existing value into the newly-allocated address before calling setAddress. This creates a copy of the parameter (i.e. pass by value).
Reading/Writing to Local Variables
Reading and writing of local variables is encapsulated by Identifier::readFrom and Identifier::writeTo. As with the previous part, the code for arrays is provided for you. You just need to create the load and store instructions for normal variables in the else cases. Remember that the address to load and store from is saved in the identifier. The first parameter to CreateLoad is the type stored in the pointer, which in this case is just getAddress()->getType()->getPointerElementType().
The getPointerElementType() function is deprecated (but still works) in LLVM 15.x and will be removed in LLVM 17.x. This is part of LLVM’s shift towards opaque pointers in the IR, which you can read more about here.
At this point, test015, emit04, and emit09 should also pass.
ASTIncExpr and ASTDecExpr
For these two nodes, you’ll want to read the identifier using readFrom, generate an add or sub instruction for the value, and then write it back into the identifier with writeTo. Once these two nodes are implemented, emit06 should also pass.
ASTNotExpr
For this node, you can’t simply generate the sub expression and then CreateNot. This is because CreateNot just performs a one’s complement. However, in C anything other than zero should return zero. To implement this, you must ICmpEQ against zero and then ZExt to a 32-bit integer.
ASTWhileStmt
This node will require creating basic blocks via BasicBlock::Create. The control flow of a while loop should be as follows:
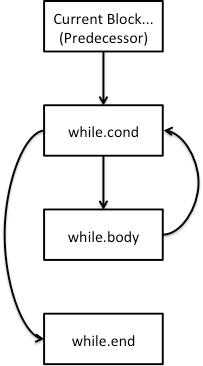
This means the predecessor block has an unconditional branch to the while.cond block, which will either branch to while.body or while.end, depending on the result of the condition expression. The while.body block has an unconditional branch to the while.cond block. Note that when you create a basic block, you can pass in a suggested name for the block via the second parameter. To help with debugging, you should follow the same naming convention as in the diagram.
The other aspect you need to make sure of is that you update the mBlock in the CodeContext as appropriate. So for example, when you are emitting the condition, you need to make sure mBlock is set to the block corresponding to while.cond.
Once while loops are implemented, you should now also pass the emit07, emit08, emit09, opt05, and opt06 test cases.
ASTAssignStmt
This node simply needs to emit the expression and write the value of the expression to the identifier.
ASTIfStmt
If statements have two possibilities – either there is an if statement by itself, or an if statement with an associated else statement. The control flow of an if statement should be as follows:
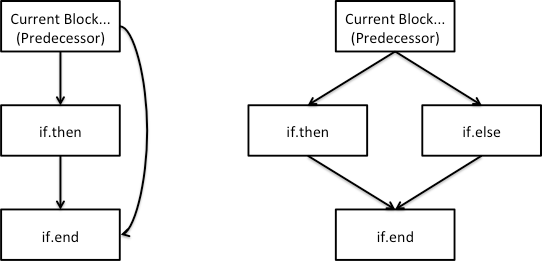
As with the while loop, you will need to create the appropriate basic blocks and generate the code in these basic blocks.
Once you implement if statements, your code should now pass all the remaining test cases.
Testing on GitHub
Once you pass all the tests locally, you should push your code to GitHub and manually run the PA3 unit tests. If they don’t pass or your code doesn’t compile, you should make the necessary fixes and try again.
For this assignment, there are a total of 21 test cases. Each test failure is -5 points.
Submitting Your Assignment
Once you have a GitHub Actions run you are happy with, to submit the assignment you need to submit this form on Gradescope. You will have to provide the full URL for the actions run you want us to grade, and also tell us if you are using any of your four slip days.
Make sure you submit this form, as otherwise we will not know that you have a submission you want us to grade. We only grade based on your GitHub Actions run and code on GitHub, and we will not download everyone’s repo. If your code does not compile or you do not submit the form, you will get a 0 on the assignment.
Making a Git Tag
Once you’ve submitted your assignment, you should make a tag so it’s easier to go back to the specific pa3 submission later, should you need to:
git tag pa3
git push origin --tags
Conclusion
You now have a functional compiler in that all USC source programs will compile into LLVM bitcode. If you wanted to, you could also emit actual machine code for your machine via llc. The next two labs will be focused on improvements to the LLVM IR generation. In PA4, you will greatly reduce the number of stack memory instructions by implementing generation of SSA form for local variables. In PA5, you will implement optimization passes that will further improve execution time of the generated bitcode. Finally, in PA6 you will implement register allocation to emit target-specific assembly.